Thursday 31 October 2013

Tiddly Inks - Halloween bloghop

Goedemorgen, welkom op de Tiddly Inks halloween bloghop! Vandaag vieren we onze favoriete tijd van het jaar met een mooie en leuke bloghop. Zijn jullie er klaar voor? Jullie hebben tot 2 november de tijd om mee te hoppen.

Onderweg kom je op veel blogs en we zouden het leuk vinden als jullie op ieder blog een commentaartje zouden achterlaten. Door het achterlaten van een commentaar maak je kans op een tegoedbon van 10 dollar voor de Tiddly Inks shop. De winnaar wordt op 3 november bekend gemaakt!

Tijdens het hoppen zal je een aantal nieuwe Tiddly Inks afbeeldingen zien. Deze zijn een soort van sneak peaks voor een grote nieuwe release op 1 november. Kom dan ook even kijken om kans te maken op één van de nieuwe afbeeldingen. 

Welcome to the Tiddly Inks Halloween Blog Hop!  Today, we are celebrating our favorite time of year with a beautiful and fun hop for all of you.  Are you ready to get your Halloween on?   You'll have until November 2nd to hop with us.


There are many blogs along the way and we'd love for you to leave a comment on each blog.  Leaving a comment will make you eligible for a chance to win a most fabulous prize; a $10 gift certificate to anything digital in our store!  The winner will be announced on November 3rd!

Along the way you will see a number of NEW Tiddly images you've never seen before.  It's a bit of a sneak peak as the release isn't until tomorrow.  Make sure to join us back on theTiddly Inks blog tomorrow for the new release and a chance at winning your choice of one of the new digital stamps!!!


Ik heb voor deze hop een kaartje gemaakt met de afbeelding  Witchy Wryn van Tiddly Inks. Ik heb haar ingekleurd met mijn potloden en de zwarte glaze pen. Rondom de afbeelding heb ik gekleurd met oranje krijt. Ik heb de afbeelding uitgesneden met de rechthoekige nestabilities. Langs de randen heb ik een lijntje gedoodled met een zwarte pen. Ik heb ook nog een klein spinnetje getekend. Op de kaart heb ik ook eerst lijntjes getekend langs de randen. Op paars papier heb ik zwart-wit stipjes papier geplakt. De onderste rand van het paarse papier is geponst met de dotted scallop border punch van EK success. De tekst komt uit de set Bugs & hisses van There she goes clear stamps. Uit paars papier heb ik een grote ster gemaakt met de Stacking stars dienamic van My favorite things. Ik heb hierop lijntjes getekend met een zwarte pen. Daarna heb ik een wit knoopje op de ster geplakt. 

I made a card for this hop with the image Witchy Wryn from Tiddly Inks. I coloured her with my pencils and a black glaze pen. I coloured around the image with orange chalk. I have cut the image out with the rectangle nestabilities. I doodled on the edges of the rectangle with a black pen and I also doodled a little spider. On the card I also doodled some lines. On a piece of purple paper I adhered some black and white dotted paper. I punched the bottom border with the dotted scallop border punch from EK success. The sentiment is from the set Bugs & hisses from There she goes clear stamps. I have used the Staking stars dienamic die from My favorite things. I doodled some lines on it and then I added a white button.

Ready to hop...then get going!


I want to enter my card in the following challenges:
*********************************************************************************
IMAGE: Too cute to spook - Witchy Wryn from Tiddly Inks, Bugs & hisses from There she goes clear stamps
PAPER: White and purple cs, Vintage stars from Pink petticoat
INK: Versafine onyx black
ACCESSORIES: Pencils, black glaze pen, orange chalk, rectangle nestabilities, black pen, white gelpen, dotted scallop border punch from Ek succes, white button, Stacking stars dienamics from My favorite things.

Wednesday 30 October 2013

Sweet sketch wednesday met tommy de wizard


Goedemorgen, vandaag ben ik te gast bij het Sweet sketch wednesday challenge blog. Hun sketch challenge van deze week wordt gesponsord door Stampfairy. De challenge is dus deze leuke sketch, ik heb er gauw nog maar een halloween kaartje mee gemaakt.
Op het kaartje heb ik een afbeelding uit de Tommy wizard collectie van Stampfairy gebruikt. Ik heb Tommy ingekleurd met mijn potloden de zwarte glaze pen. Rondom de afbeelding heb ik gekleurd met lichtpaars krijt. Op de bril van Tommy heb ik glossy accents aangebracht. Ik heb de afbeelding uitgesneden met de ovalen nestabilities en daarna heb ik een lijntje langs de rand gedoodled. Op mijn kaart heb ik zwart-wit sterretjes papier geplakt. Uit oranje papier heb ik 3 trips papier gesneden en deze heb ik over het sterretjes papier geplakt. Op de stripjes heb ik een lijntje gedoodled met een zwarte pen.

Goodmorning, today I am a guest at the Sweet sketch wednesday blog. Their challenge will be sponsored by Stampfairy this week. The challange is a real fun sketch and decided to make a halloween card with it. 
On my card I have used an image from the Tommy wizard collection from Stampfairy. I have coloured Tommy with my pencils and a black glaze pen. I have coloured around the image with soft purple chalk. I have added glossy accents on Tommy's glasses. I have cut the image out with the oval nestabilities and then I doodled some lines on the edge of the oval with a black pen. On my card I adhered black and white star paper. I have cut 3 strips out of orange paper and adhered those on the card. On the strips I added a doodled line.

*********************************************************************************
IMAGE: Tommy wizard from Stampfairy
PAPER: White and orange s, black and white star paper
ACCESSORIES: Pencils, black glaze pen, purple chalk, oval nestabilities, black pen.

Monday 28 October 2013

Love to create - Halloween


Goedemorgen, vandaag ben ik te gast op het Love to create challenge blog, want hun challenge wordt gesponsord door Stampfairy deze week. De challenge is halloween. 
Ik heb een kaartje gemaakt met een afbeelding uit de Mimi halloween 1 collectie van Stampfairy. Ik heb Mimi ingekleurd met mijn potloden en de zwarte glaze pen en daarnaast heb ik gekleurd met de clear wink of stella brush pen, maar dat is zo moeilijk om mooi op de foto te krijgen. Ik heb Mimi uitgeknipt en op zwart papier geplakt. Op het zwarte papier heb ik een stiklijntje getekend met een witte gelpen. Op de kaart heb ik eerst oranje papier geplakt en daarop heb ik verschillende zwart-witte design papiertjes geplakt. Ik vond het zo een heel leuk geheel worden. De tekst is gemaakt op de computer. Uit het oranje papier heb ik daarna nog een aantal sterretjes geponst en deze heb ik op het design papier geplakt. 


Goodmorning, today I am a guest at the Love to create challenge blog, because Stampfairy is sponsoring their challenge this week. The challenge is Halloween. 
I made a card with an image from the Mimi halloween 1 collection from Stampfairy. I coloured Mimi with my pencils and the black glaze pen and I also coloured on it with the clear wink of stella brush pen, but that is oh so hard to capture on a picture. I cut Mimi out and adhered her on black paper. I added faux stitching to the black paper with a white gelpen. On the card I first added a layer of orange paper and on top of that I added several black and white design papers. The sentiment is made with the computer. I punched a couple of stars out of the orange paper and adhered those on the card.

I want to enter my card in the following challenges:

*********************************************************************************
IMAGE: Mimi halloween 1 from Stampfairy
PAPER: Orange and black cs, black and white design papers.
ACCESSORIES: Pencils, black glaze pen, white gelpen, clear wink of stella brush pen, star punch

Saturday 26 October 2013

Tiddly Inks - Vamboto


Hallo! Ik kom er net achter dat deze post helemaal niet op mijn blog terecht is gekomen...oeps. Was al de bedoeling dat hij donderdag op mijn blog zou staan, maar blijkbaar heb ik iets fout gedaan. Maar goed dan post ik hem gewoon nu. :)
Ik heb een halloween kaartje gemaakt met Vamboto van Tiddly Inks, het schattige robotje dat verkleed is voor Halloween. Ik heb Vamboto ingekleurd met mijn potloden en de zwarte glaze pen. Ik heb de afbeelding uitgeknipt. Op mijn kaart heb ik eerst lijntjes gedoodled met een zwarte pen. Daarna heb ik zwart-wit gestreept papier opgeplakt dat op een laagje oranje papier is geplakt. Het sierrandje onderaan is gemaakt met de Pinking edge dienamic die van My favorite things. De tekst is op de computer gemaakt. De tekst got candy is gemaakt met het Moxie alfabet van Quickutz. Ik heb nog een paar zwarte hotfix sterretjes opgeplakt ter versiering.

Hello! I just found out, that this card hasn't been posted on my blog. It was supposed to go up this thrusday, but I think I did something wrong. No problem, I will post it today instead. :)
I made a halloween card with Vamboto from Tiddly inks. Isn't he cute all dressed up for halloween? I coloured Vamboto with my pencils and the black glaze pen. I cut the image out. On my white card I started with doodling some lines with a black pen. Then I added a layer of black and white striped paper that was adhered on orange paper. I have used the pinking edge dienamic die from My favorite things to cut the border. The little sentiment is made on the computer. The got candy sentiment is made with the Moxie alphabet from quickutz. I decorated the card with a couple of black hotfix stars.


I want to enter my card in the following challenges:

*********************************************************************************
IMAGE: Robot holidays from Tiddly inks
PAPER: White and orange cs
ACCESSORIES: Pencils, black glaze pen, black hotfix stars, moxie alphabet from quickutz, Pinking edge dienamic die from My favorite things.

Friday 25 October 2013

Fairytale challenge - Yellow, orange and red


Goedemorgen, vandaag is weer een nieuwe challenge op het Fairytale challenge blog. Deze week hebben we een kleurencombinatie als challenge namelijk: geel, oranje en rood.
Ik voor vandaag een verjaardagskaartje gemaakt met bloemen erop. De bloemen en vlinder zijn gestempeld met de set On your special day van Marion Emberson designs. De tekst komt uit de stempelset Find joy everyday van Marion Emberson designs. Ik heb de afbeeldingen en de tekst op een rechthoek gestempeld die ik uit linnen papier heb gesneden. Op het linnenpapier heb ik daarna strips post-it tape geplakt. Ik ben onderaan begonnen en ik heb in totaal 4 strips opgeplakt. Daarna heb ik met de ink blender tool van Ranger en spiced marmelade distress inkt een eerste inktlaag aangebracht. Ik heb de inkt heel licht aangebracht zodat het meer geel dan oranje lijkt. Daarna heb ik de eerste strip tape weggehaald en toen heb ik wat meer inkt aangebracht. Zo ben ik doorgegaan tot ik het hele paneel had gekleurd. De onderste laag heb ik nog extra donker gemaakt met festive berries en fired brick distress inkt.

Goodmorning, today a new challenge starts on the Fairytale challenge blog. This week we have a colour combination challenge. We want you to use yellow, orange and red on your card.
For todays challenge I made a birthday card. The flowers and butterfly are stamped with the set On your special day from Marion Emberson designs. The sentiment is from the the set Find joy everyday from Marion Emberson designs. I stamped the images and the sentiment on a piece of rectangle cardstock with linen structure. I added 4 strips of post-it tape starting from the bottom on the rectangle. Then I started applying ink on the top layer with the ink blender tool from Ranger and spiced marmelade distress ink. I used very light pressure to make sure that I didn't add to mach colour. This way I got the first yellow layer. Then I remvoed the first strip and applied more ink and this time I used a bit more pressure. After I ahd done all the layers I added on the bottom layer also some red ink with festive berries and fired brick distress ink. 

I want to enter my card in the following challenges:
*********************************************************************************
IMAGE: Find joy everyday and On your special day from Marion Emberson designs.
PAPER: White cs
INK: Versafine onyx black, Spiced marmelade, festive berries and fired brick distress ink
ACCESSORIES: Post-it roll.

Tuesday 22 October 2013

Huwelijkskaartje


Hallo, vandaag laat ik een kaartje zie dat ik heb gemaakt in opdracht. Er werd me gevraagd om een huwelijkskaartje te maken voor een stel dat 12,5 jaar getrouwd. Het mocht grappig of lief zijn en ze waren gek op hondjes. Ik ben dus op zoek gegaan naar een passende afbeelding en die vond ik bij de Digistamp boutique. Ik vond deze afbeelding uit de Toby and Tobias collectie echt perfect voor een huwelijkskaartje. Ik heb de afbeelding 1 keer gewoon geprint en daarna heb ik de afbeelding nog een keer iets groter gemaakt zodat de hondjes iets meer dezelfde maat hebben. Ik heb de afbeelding ingekleurd met mijn potloden en daarna heb ik met blauwe inkt een wolkenachtergrond gemaakt. Ik heb de afbeelding op donkerblauw papier geplakt en daarna op de kaart geplakt met licht blauw geruit papier. Ik heb 3 kleine hartjes uit rood papier gestanst met de Holiday shapes hearts stars die van Simon says stamp. Ik heb de hartjes daarna gekleurd met de clear wink of stella brush pen en daarna heb ik er glossy accents op aangebracht. 

Hello, today I am showing you a card that I had to make for someone. I was asked to make a card for a couple who are married 12,5 years. I could be a funny or cute card and would be perfect with some dogs on it. So I had to find a perfect image for it and I found one at the Digistamp boutique. This image from the Toby and Tobias collection is perfect for an anniversary card. I printed the image once normal and one time after I had enlarged the image. This way the dogs are more the same size. I have coloured the image with my pencils and I made a cloudy background with blue ink. I adhered the image on navy coloured paper and then I adhered it on blue gingham paper. I punched 3 tiny hearts out of red paper with the Holiday shapes hearts stars die from Simon says stamp. I coloured the hearts with a clear wink of stella brush pen and then I applied glossy accents on it. 


De kaart opent in het midden van de kaart. Ik vond het wel een leuk modelletje voor mijn kaart.

The card opens in the middle of the card. I thought it was a nice shape for the card.


Binnenin de kaart heb ik heb de tekst geplaatst en ook nog een keer de afbeelding maar dan kleiner. Ook deze tekst heb ik op donkerblauw papier geplakt en daarna heb ik het geheel in de kaart geplakt.

Inside the card I added a sentiment and I also added the image again, but a bit smaller this time. I adhered this panel on navy paper and then I adhered everything in the card.

*********************************************************************************
IMAGE: Toby and Tobias from the Digistamp boutique.
PAPER: White and navy cs, blue gingham paper.
ACCESSORIES: Pencils, black glaze pen, Holiday shapes hearts stars die from Simon says stamp, clear wink of stella brush, glossy accents.

Thursday 17 October 2013

Vakantie in Praag

Hallo! Vorige week ben ik op vakantie geweest naar Praag. Een hele mooie stad! We hebben redelijk geboft met het weer. Het was droog en niet te koud. Alleen op de laatste avond en de allerlaatste dag regende het. Ik had Annette beloofd om foto's te plaatsen en dat doe ik dus nu.

Hello! Last week I have been on a short break to Prague. A really beautifull city. We had good weather...almost no rain and not too cold. Only the last evening and the last we had rain. I promised Annette to post some pictures..so here is my post.


Op de Old town square met het Oudestadsraadhuis.

On the Old town square the Old town hall


De astronomische klok op het Oudestadsraadhuis.

The astronimcal clock on the Old town hall.


De Tynkerk

The Tyn church


De Karelsbrug gezien vanaf een bootje op de Moldau

Charlesbridge seen from a boat on the Vtlava river


De Karelsbrug gezien vanaf een bootje op de Moldau

Charlesbridge seen from a boat on the Vtlava river


De Praagse burcht

The Prague castle


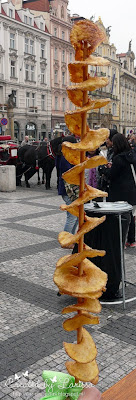
Een aardappel snack, die veel op straat wordt verkocht.

A potato snack, that is sold on many streets.


Eén van de vele mooie gebouwen.

One of the many very beautiful buildings.


De tuin in het zomerpales van koningin Anna

The garden in the  Royal summer palace


Het zomerpaleis van Koningin Anna

The Royal summer palace.


De sportzaal ;) bij het zomerpaleis

A sport hal ;) at the summer palace.


Een kijkje vanuit de tuin bij het zomerpaleis naar de Sint-Vitus kathedraal.

A view from the gardens at the Summer palace on the St Vitus cathedral


Gebouw op het burchtplein

Building on the castle square.


Vanaf de burcht heb je een heel mooi uitzicht over de stad.

Prague seen from the castle.


Sint -Vitus kathedraal

St Vitus cathedral.


Sint -Vitus kathedraal

St Vitus cathedral.


Vanaf de burcht heb je een heel mooi uitzicht over de stad.

Prague seen from the castle.


"S avonds is de stad mooi verlicht, oa de Tynkerk

At night the city is so pretty with all the lights. this is Tyn church again.

Tuesday 15 October 2013

Tiddly Inks challenge - Halloween creepy cute


Goedemorgen, vandaag begint er weer een nieuwe Tiddly Inks challenge en deze week is de challenge Halloween creepy cute. We willen dus schattige halloween kaartjes zien. Op mijn kaartje heb ik de afbeelding Avenger - Candy hero van Tiddly Inks gebruikt. Ik heb de afbeelding ingekleurd met mijn potloden en de zwarte glaze pen en daarna heb ik de afbeelding uitgeknipt. Ik heb de avenger op een aantal cirkels geplakt die ik heb uitgesneden met de silhouette. Op de witte cirkel heb ik een stiklijntje getekend met een zwarte fineliner Op mijn oranje kaart heb ik eerst groen papier geplakt en daarop heb zwart-wit stipjes papier geplakt. Uit zwart, oranje en groen papier heb ik 3 banners gesneden. De letters van het woord Boo heb ik gemaakt met het Olivia alfabet van quickutz. Uit zwart papier heb ik nog een cirkeltje geponst en daarop heb ik een wit strikje geplakt.

Goodmorning, today a new Tiddly Inks challenge starts and our challenge this week is Halloween creepy cute. So we want to see cute halloween cards. On my card I have used the image Avenger - Candy hero from Tiddly Inks. I have coloured the image with my pencils and the black glaze pen and then I cut the image out. I adhered the avneger on a couple of circles that I cut with my nestabilities. On the white circle I added faux stitching with a black pen. On the orange card I first adhered a layer of green paper and then I added black and white dotted paper. I have cut 3 banners out of green, black and orange paper. The letters from the word boo are made with the Olivia alphabet from quickutz. I punched a circle out of black paper and added a white bow on top of it. 

I want to enter my card in the following challenges:

*********************************************************************************
IMAGE: Avenger - Candy hero from Tiddly Inks
PAPER: Black, orange, white and green cs
ACCESSORIES: Pencils, black glaze pen, circle nestabilities, black pen, Olivia alphabet from quickutz, circle punch, white ribbon, white gelpen.

Sunday 13 October 2013

Simpele kerstkaartjes


Hallo! Vandaag laat ik een 2 kerstkaartjes zien die ik een tijd geleden al heb gemaakt. Ik was ze eigenlijk al vergeten totdat ik net dezelfde afbeelding zag langskomen bij iemand anders op het blog. ;) Ik heb gewerkt met afbeeldingen van de Digistamp boutique, de bovenste is Festive hug en de onderste is Cute polar bear. Beide afbeeldingen zijn ingekleurd met mijn potloden en daarna heb ik ze uitgeknipt. Op de onderkant van de afbeeldingen heb ik de tekst gestempeld met de set Christmas handwritten phrases van Lili of the valley. Ik heb gestempeld met Versafine mdnight blue ink. Op de kaarten heb ik blauw sterrenpapier geplakt. Op de bovenste kaart heb ik er nog een wit lintje omheen gebonden. Op de onderste kaart heb ik nog een klein wit sterretje geplakt dat ik heb geponst. 

Hello! Today I am showing you 2 christmas cards that I made a while ago. I actually totally forgot them, but today I saw one of these images on a blog. ;) I have worked with images from the Digistamp boutique. The image on the upper card is Festive hug and the image on the bottom card is Cute polar bear. I coloured both images with my pencils and then I cut them out. I stammped the sentiments on the bottom of the images with Midnight blue ink from Versafine. I used the set Christmas handwritten phrases from Lili of the valley.  On both the images I used blue starry paper. On the upper card I wrapped a white ribbon around it and on the bottom card I added a tiny white star that I punched.


I want to enter these cards in the following challenges:

*********************************************************************************
IMAGE: Festive hug and polar bear from Digistamp boutique, Christmas handwritten phrases from Lili of the valley.
PAPER: White cs, blue starry paper
INK: Midnight blue from Versafine
ACCESSORIES: Pencils, black glaze pen, white ribbon, star punch.

Friday 11 October 2013

Fairytale challenge - Bingo


Goedemorgen, vandaag begint er weer een nieuwe challenge op het Fairytale challenge blog. Deze week hebben we een bingo challenge. Heel leuk om te doen! Ik heb een kaartje gemaakt dat aan 2 lijntjes voldoet: Sneeuwvlokken - Knopen - Kerstmis en Kerstmis - Wintertijd - Blauw en wit. 

Goodmorning, today a new challenge starts on the Fairytale challenge blog. This week we have a bingo challenge. I love a bingo challenge! I made a card that follows 2 bingo lines: Snowflakes - Buttons - Christmas and Christmas - Winter time - Blue and white.


Ik heb voor deze challenge een kerstkaartje gemaakt met een stempel van Lili of the valley. Dit is Snow family en ik heb de afbeelding ingekleurd met mijn potloden, een zwarte glaze pen en blauw krijt. Op de sneeuwvlokken en de sneeuw heb ik stickles aangebracht. De afbeelding heb ik uitgesneden met de ovalen nestabilities. Op mijn kaart heb ik design papier uit Frosty christmas paperpad van Lili of the valley gebruikt. Het donkerblauwe sneeuwvlokje is gestanst met de Let it snowflake dienamic dies van My favorite things. Ik heb midden op de sneeuwvlok een wit knoopje geplakt. De tekst komt uit de Christmas handwritten  phrases set van Lili of the valley.

I made a christmas card for this challenge and I used a Lili of the valley stamp. This is Snow family and I have coloured the image with pencils, a black glaze pen and blue chalk. I added stoickles to the snow in the image. The image was cut with the oval nestabilities. On my card I used design paper from the Frosty christmas paperpad from Lili of the valley. The dark blue snowflake was cut with the Let it snowflake dienamics die from My favorite things. I added a white button to the centre of the snowflake. The sentiment is from the Christmas handwritte phrases stampset from Lili of the valley.


*********************************************************************************
IMAGE: Snow family and Christmas handwritten phrases from Lili of the valley
PAPER: Navy cs, Frosty christmas papaerpad from Lili of the valley
INK: Versafine onyx black
ACCESSORIES: Pencils, black glaze pen, blue chalk, oval nestabilities, Let it snowflake dienamic die from My favorite things, white button, red thread, stickles.

Wednesday 9 October 2013

Birthday card for Annette


Goedemorgen, vandaag laat ik de kaart zien die ik heb gemaakt voor de verjaardag van mijn blogvriendin Annette. Ze heeft mijn kaart al ontvangen en hij was zelfs op tijd. Ik heb een kaart gemaakt met één van de Uptown girl stempels van Stamping bella. Ik vind de stempels erg leuk, maar wat zijn ze groot! In dit geval kwam het goed uit, want ik had besloten om mijn cadeautje voor Annette in de kaart te verwerken en dus moest ik sowieso een grote kaart maken. Dit is Uptown girl Bianca loves her big cake van Stamping Bella. Ik heb de afbeelding ingekleurd met mijn potloden en de zwarte glaze pen. Ik heb verder heel veel gekleurd met mijn clear wink of stella pen. Annette is gek op roze en op glitter, dus het pas perfect bij haar. Rondom de afbeelding heb ik lijntjes gedoodled met een zwarte fineliner. De afbeelding is op roze karton geplakt en de onderrand daarvan is gestanst met een rand die van Magnolia. Ik heb ook nog een wit lintje om het roze karton gebonden. De tekst is gestempeld met de set Sophie's sentiments van Lawn fawn. Ook hier heb ik weer gedoodled met de zwarte fineliner. Uit roze karton heb ik een cirkel gesneden en die heb ik links boven op de kaart geplakt. Op de cirkel heb ik een witte bloem geplakt die ik heb geponst met de retro flower punch. Uit roze papier heb ik nog een klein hartje geponst. Deze heb ik eerst gekleurd met de clear wink of stella pen en daarna heb ik er glossy accents op gebruikt. Zo gaat het hartje super mooi glimmen en glinsteren.

Goodmorning, today I am showing you the card that I made for the birthday of my sweet blogfriend Annette. She already has received the card and it was on time! Woohoo. I made a card with one of the Uptown girl stamps from Stamping Bella. I really love these stamps but they are so large! In this case it was no problem , because I had decided to add my gift to Annette in my card, so My card had to be large. This is Uptown girl Bianca loves her big cake from Stamping Bella. I have coloured the image with my pencils and a black glaze pen. I also coloured with the clear wink of stella pen. Annette loves pink and glitter, so I ahd to use it for her. I doodled around the image with a black pen. I adhered the image on pink paper. I cut the bottom of the pink paper with an edge die from Magnolia. I also wrapped a white ribbon around the pink cardstock. The sentiment is stamped with the Sophie's sentiments set from Lawn fawn. I doodled around the sentiment. I cut  a circle out of pink paper and added a white flower on it, that I punched with the retro flower punch. I punched a little heart out of pink cardstock and coloured it with a clear wink of stella pen. Then I applies glossy accents on it , this way the heart has a really nice shine and shimmer. 


Binnenin de kaart heb ik vak gemaakt voor een stempelset. Ik heb het vak beplakt met design papier en daarna heb ik er een bloem op geplakt die ik gestanst heb met de Creative flowers die 20 van Crealies. In het midden van de bloem heb ik een cirkel geplakt die ik heb geëmbost met de swiss dots embossing folder.

Inside the card I made a pocket for a stampset. I decorated the pocket with design paper  and then I added a flower that I cut out of pink cs with the Creative flowers die 20 from Crealies. In the centre of the flower I adhered a circle that I embossed with the swiss dots embossingfolder.

*********************************************************************************
IMAGE: Uptown girl Bianca loves her big cake from Stamping Bella, Sophie's sentiments from Lawn fawn.
PAPER: Pink cs
INK: Versafine onyx black
ACCESSORIES: Pencils, black glaze pen, clear wink of stella brush, black pen, circle nestabilities, white ribbon, retro flower punch, heart punch, glossy accents, Creative flowers 20 from Crealies, swiss dots embossingfolder.

Tuesday 8 October 2013

Kaarsje


Hallo, hier ben ik weer met een nieuwe projectje. Een tijdje geleden heb ik een aantal kaarsje gekocht. Ik vond ze erg grappig omdat ze op een lamp lijken. Ik wilde een kaarsje cadeau geven en daarom heb ik er een eigengemaakt doosje bij gemaakt, gewoon omdat het dan nog leuker is om een cadeautje weg te geven. ;) Op de silhouette heb ik een doosje ontworpen en dit heb ik uit wit papier gesneden. Het doosje heb ik daarna versierd met rood-wit stipjespapier. Past namelijk perfect bij de rode kaarsjes. Uit hetzelfde stippenpapier heb ik daarna nog wat bloemetjes en takjes gestanst en deze heb ik op het doosje geplakt. In het midden van de bloemen heb ik een hotfix steentje geplakt. 


Hello, here I am again with a new project. A while ago I bought a couple of candles. I thought they were really funnt because they look like little lamps. I decided to make a little present out of it. So I designed a matching box for it, because this way it is even more fun to give this candle as a present. I designed a box on the silhouette and cut it out of white paper. I decorated it with red and white dotted paper. It goes perfect together with the candle. I also cut a couple of flowers from the same dotted paper and a couple of leaves and adhred those on the box. In the centre of the flowers I used a white hotfix. 


Op de zijkant van de doos heb ik een wit lintje gebruikt en ook een paar cirkels, die ik heb uitgesneden met mijn nestabilities. 

On the side of the box I added a ribbon and a couple of circles that I cut with my nestabilities. The sentiment says especially for you.


En dit is nog even een foto van mijn eigen roze kaarsje. De rode had ik al weggeven, dus die kon niet meer op de foto. ;)

And this is a picture of my pink candle. I had given the red one away, so I wasn't able to take a picture of that one. ;)

Sunday 6 October 2013

Congratulations


Hallo, vandaag laat ik een kaartje zien dat ik al een tijdje geleden heb gemaakt. Ik was er nog niet aan toegekomen om het op mijn blog te plaatsen. De afbeelding die ik op mijn kaart heb gebruikt is van All dressed up stamps. Wendy Burns is de artiest en ze maakt erg leuke afbeeldingen. Ik heb mijn afbeelding ingekleurd met mijn potloden en de zwarte glaze pen. Ik heb de afbeelding uitgesneden met mijn ovalen nestabilities en daarna heb ik een stiklijntje getekend met een zwarte fineliner. Ik heb nog een paar kleine blauwe steentje bij de afbeelding geplakt. Op de oranje kaart heb ik eerst stiklijntje getekend met een witte gelpen. Daarna heb ik nog 3 stripjes wit papier op de kaart geplakt. De tekst komt uit de Essential sentiments stempelset van My favorite things

Hello, today I am showing you a card that I made a while ago. The image that I used on my card is from All dressed up stamps. Wendy Burns is the artist behind these images and I think they are lovely. I have coloured my image with my pencils and a black glaze pen. I cut the image out with the oval nestabilities and then I added faux stitching on it with a black pen. I also added a couple of tiny blue gems. On the orange card I started with drawing the faux stitching square with a white gelpen. Then I added a couple of white strips of paper. The sentiment is from the Essential sentiments set from My favorte things.


I want to enter this card in the following challenges:

*********************************************************************************
IMAGE: I love my puppy from All dressed up stamps, Essential sentiments from My favorite things
PAPER: Orange and white cs
ACCESSORIES: Pencils, black glaze pen, oval nestbilities, black pen, blue gems

Wednesday 2 October 2013

ABC christmas challenge - T is for transparent


Goedemorgen, vandaag ben ik weer eens te gast bij het ABC christmas challenge blog, want Stampfairy sponsort hun challenge deze week. De challenge is T is for transparent. Je moet dus ergens een sheet op je kaartje verwerken. Ik heb ervoor gekozen om een deel van de voorkant van mijn kaart weg te snijden en dit te vervangen door de sheet. Op mijn kaartje heb ik gewerkt met de afbeelding uit de Lenny christmas collectie van Stampfairy. Ik heb de afbeelding 2 keer geprint, één keer normaal en nog een keer gespiegeld. Ik heb de afbeeldingen ingekleurd met mijn potloden en de zwarte glaze pen. Daarna heb ik ze beide uitgeknipt. Zo kon ik de afbeelding op de sheet plakken en de gespiegeld afbeelding op de achterkant van de sheet, zodat al mijn plakband mooi weggewerkt is. Op mijn rode kaart heb ik rood gestreept papier geplakt. De randjes heb ik uit groen papier gesneden met de scalloped lace stitch die van Magnolia. De tekst komt uit een stempelsetje van My favorite things.


Goodmorning, today I am a guest at the ABC christmas blog, because Stampfairy is sponsoring their challenge this week. The challenge is T is for transparent. I decided to replace part of the front of my card with a sheet. On my card I worked with an image from the Lenny christmas collection from Stampfairy. I printed the image, once normal and the other image was mirrored. I coloured both images with my pencils and a black glaze pen. Then I cut them both out. This way I could adhere on image on the front of the card and adhere the other image on the inside of the card on top of the first image. This way my double sided tape is hidden. On my card I used red striped paper. I have cut the 2 borders out of green paper with the scalloped lace stitch die from Magnolia. The sentiment is stamped with a sentiment set from My favorite things.

Binnenin de kaart heb ik stippen getekend met een witte molotow marker.

On the inside of the card I coloured dots with a white molotow marker.


En zo ziet de binnenkant van de kaart eruit. Ook binnenin heb ik design papier geplakt om de plakranden van de sheet weg te werken.

And this is what the inside of the card looks like. I added more design paper to remove the glue edges on the sheet.

*********************************************************************************
IMAGE: Lenny crhistmas from Stampfairy, christmas sentiments from My favorite things
PAPER: Red and green cs, red striped paper
INK: Versafine onyx black
ACCESSORIES: Pencils, black glaze pen, scalloped lace stitch die from Magnolia, white ribbon, white molotow marker.

Tuesday 1 October 2013

Tiddly Inks challenge - Anything goes


Goedemorgen, vandaag is er weer een nieuwe Tiddly Inks challenge en deze week is het heel makkelijk, want de challenge is namelijk Anything goes, dus alles mag! Op mijn kaartje heb ik de afbeelding Bake me some love van Tiddly Inks gebruikt. Als je deze afbeelding van Wryn koopt, krijg je de afbeelding van de tafel er gratis bij. Ik heb de afbeeldingen samen geprint en ze daarna ingekleurd met mijn potloden en de zwarte glaze pen. Rondom de afbeelding heb ik gekleurd met blauw krijt. Onder de afbeelding heb ik roze karton geplakt. De onderkant daarvan heb ik geknipt met een scallop schaar. Onder en boven de afbeelding heb ik een randje gestikt. De tekst heb ik op de computer gemaakt en daarna heb ik hem uitgesneden met een cirkelpons en deze heb ik op een roze scallop cirkel geplakt. Het design papier is van Paper chic.

Goodmorning, today a new challenge starts on the Tiddly Inks challenge blog and this week we have a really easy challenge: Anything goes! On my card I have used the image Bake me some love from Tiddly Inks. If you buy this Wryn image, you will get the table as an extra image. I printed the images together and coloured them with my pencils and the black glaze pen. I coloured around the image with blue chalk. I adhered the image on pink cardstock and I have cut the bottom with scalloped scissors. I have stitched under and above the image. The sentiment was made on the computer and I punched it with a circle punch. I adhered it on  pink scalloped circle. The design paper is from Paper chic.

*********************************************************************************
IMAGE: Bake me some love from Tiddly Inks
PAPER: White and pink cs, paper cic design paper
ACCESSORIES:  Pencils, black glaze pen, blue chalk, scalloped scissors, white cord, circle punch, scalloped circle punch.

LinkWithin

Related Posts with Thumbnails